This was the most difficult build of all the Roorkee chairs I have built to date.
 |
| The finished chair. |
The reason is due to my self-imposed restrictions: no power tools, and no lathe.
I've had in mind a lathe-less Roorkee for some time. There probably are several ways to do it, so here is my way.
The first thing I did was to rip out the stock for the legs.
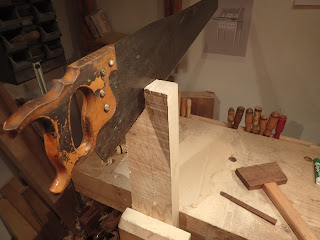 |
| Ripping legs. I laid out my lines straight with the grain. |
This is a good workout. I must say that this is one part of the build I will probably always do this way, as it is a snap to orient the grain any way you want. In this case, I wanted the grain to run as straight as possible. Also, I wanted the grain at a 45 degree angle to the faces so all four faces of each leg have the same grain pattern.
 |
| Fairly straight grain. |
Incidentally, I chose to use European ash (Fraxinus excelsior) for this chair. This particular board was nice and straight, with very little runout.
 |
| Faces and edges squared up. |
When squaring up stock for this project, I start by making a flat face and a flat edge, perfectly square to the face. With a Roorkee, there is some cheating you can do here. These ones wound up at 1 13/16" square. I have made them as thin as 1 5/8" square with no troubles. As long as all are the same, you are good. Also, squareness to the 'n'th degree isn't really necessary. Get them as square as you can without spending too much time. A little imprecision here probably does not make a whole lot of difference in the finished piece. Please note that this does not give you my permission to get sloppy!
 |
| I played with the leg orientation and came up with this. It gives the grain an even look to all the legs. Most importantly, the grain is rift-sawn on all faces, so there is no jarring difference between flat sawn and quarter sawn grain patterns on one leg. |
|
Once they are four square, I chop off an end, then saw to length. I put a triangle on the bottom of what will be the feet. These help with keeping track of orientation from here on out.
After that's done, I realized I don't have a whole lot left for stretchers.
 |
| This is all the wood I had left to make stretchers and back pieces. |
With some careful layout, I was able to get everything I needed. I want to make octagonal shaped stretchers, and because I'm using hand tools, why not make them cigar shaped, to boot?
The widest part of these are 1 1/4 inches square, so some re-sawing is in order. I don't have a kerfing plane, so I used my 1/8" blade in my plow plane to do the same thing.
 |
| Using my plow plane as a kerfing plane to prepare for re-sawing. |
Then it is back to the rip saw.
This gets a little bit easier every time I do it.
Once the thickness is set, it is easy to rip out square pieces. The angle of the endgrain doesn't matter here, as these will essentially be dowels (even though they are octagonal).
One of the boards yielded three stretcher blanks, and I got the last from a different board.
Stay tuned for the rest of this build.
Finished Chair
Part II
Part III
Part IV
Part V
Part VI
Part VII


 Then it is back to the rip saw.
 This gets a little bit easier every time I do it.
 Once the thickness is set, it is easy to rip out square pieces. The angle of the endgrain doesn't matter here, as these will essentially be dowels (even though they are octagonal).
 One of the boards yielded three stretcher blanks, and I got the last from a different board.
 Stay tuned for the rest of this build.


No comments:
Post a Comment